
Part 2: Building a container from scratch

In the previous post, we isolated the user, process, and mount points by creating new namespaces using the unshare command. However, we also noticed that the filesystem was shared within the new namespace, and changes done within the new namespace were reflected on the filesystem outside.
In this post, we are going to circumvent this issue by unmounting the root and creating a new root within our namespace. Using this method should help us isolate the file system in a similar way, as done in Docker.
Isolating the file system
As seen in the previous post, any new mounts are not reflected in the parent filesystem. However, we still have access to the root file system /. Creating, modifying, and deleting files here will still affect the files outside the namespace. What we need is an isolated filesystem, wherein the changes made to files within the namespace won't affect our host system.
One way we can do this is by unmounting the root system. However, doing this will render our namespace useless, as it will not have access to any utilities or system files to install or execute programs.
Instead what we can do is make a copy of the utilities and system files that are important for our application to run and mount them in a different folder so we can use them as our new root. i.e instead of using the system apt-get we can make a copy of it and use it from a different folder. Any install or modifications done will affect only the new folder and not the original root.
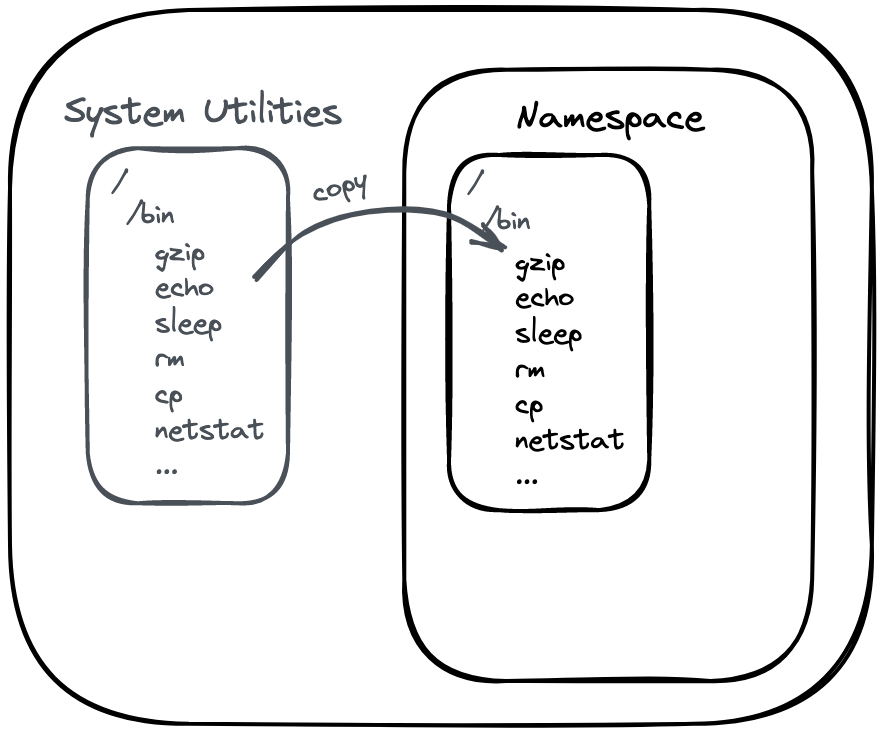
Making a copy of the root filesystem and its utilities can be a daunting task. What do we pick? Do we need all the files and folders present in bin? Does it contain environment-independent information? What about the large library folders having application information?
What we need are only the minimal required system files and libraries. Thankfully this is where Docker images come to our rescue. Docker images are an archive containing only the essential system libraries and utilities needed to install and run programs. For instance, when we write something like FROM ubuntu18:04 we do not download the entire Ubuntu OS but just the essential libraries, utilities, and system files of Ubuntu. If you notice the official repository, the image has a compressed size of just 25MB. These files are just the basic utility libraries needed to help us install and run our programs. They will be placed within the namespace and treated as the new root directory. However, the libraries will still utilize the host system kernel.
For demonstration purposes, we will use the popular alpine image, which contains a minimal set of files and folders required to explore our namespace.
Mounting a new root filesystem
Let's start by downloading the alpine archive. Head over to https://alpinelinux.org/downloads/ and download the x86_64 archive (MINI ROOT FILESYSTEM). Extract it to a folder named alpine.
$ wget https://dl-cdn.alpinelinux.org/alpine/v3.15/releases/x86_64/alpine-minirootfs-3.15.3-x86_64.tar.gz

Saving to: ‘alpine-minirootfs-3.15.3-x86_64.tar.gz’

alpine-minirootfs-3.15.3-x86_64.tar.gz    100%[====================================================================================>]   2.60M  --.-KB/s    in 0.02s

$ mkdir alpine

$ tar -xvf alpine-minirootfs-3.15.3-x86_64.tar.gz -C alpine

$ ls alpine
bin  dev  etc  home  lib  media  mnt  opt  proc  root  run  sbin  srv  sys  tmp  usr  var
As you can in the output above, the alpine folder contains the minimal structure of a typical Linux root directory. We will use this directory as our new root directory and unmount the original root directory so that we can isolate the filesystem.
Let's do that by opening up a new namespace using the same unshare command we used in the previous post.
localuser@host:~/$ unshare --user --map-root-user --pid --mount-proc --mount --fork bash

root@host:~/#
Once within the new namespace, navigate to the directory containing the alpine folder. Before we change our root folder, Linux requires the new root to be a path to a mount point. To turn the alpine folder into a mount point, we can bind mount the folder path to itself.
root@host:~/# mount --bind alpine alpine

root@host:~/# findmnt | grep alpine
└─/home/localuser/alpine                                                                   /dev/sdb1[/home/localuser/alpine] ext4        rw,relatime,discard
Now that we have that out of the way, lets cd into alpine and change the root directory using the pivot_root command.
root@host:~/# cd alpine/
root@host:~/alpine# mkdir old_root
root@host:~/alpine# pivot_root . old_root
And that's it! We have changed the root directory in our namespace.
Note that we created old_root folder within alpine, before we called pivot_root. old_root is the directory where the old root (default system root) will be mounted after the new root changes to alpine.
The pivot_root command takes two arguments new_root and put_old. According to the pivot_root docs, put_old path requires to be at or underneath new_root path which is the alpine folder in this case.
The man pages of pivot_root describe it the following way:
pivot_root() changes the root mount in the mount namespace of the
calling process. More precisely, it moves the root mount to the
directory put_old and makes new_root the new root mount.
We can verify our changes by listing the new root directory.
root@host:~/alpine# cd /
root@host:/# ls
bin       etc       lib       mnt       opt       root      sbin      sys       usr
dev       home      media     old_root  proc      run       srv       tmp       var
As we see, the new root folders are the same ones from the alpine folder. Listing old_root should show us the files and folders of the old root.
root@host:/# ls old_root/
bin             etc             initrd.img.old  lost+found      opt             run             srv             usr             vmlinuz.old
boot            home            lib             media           proc            sbin            sys             var
dev             initrd.img      lib64           mnt             root            snap            tmp             vmlinuz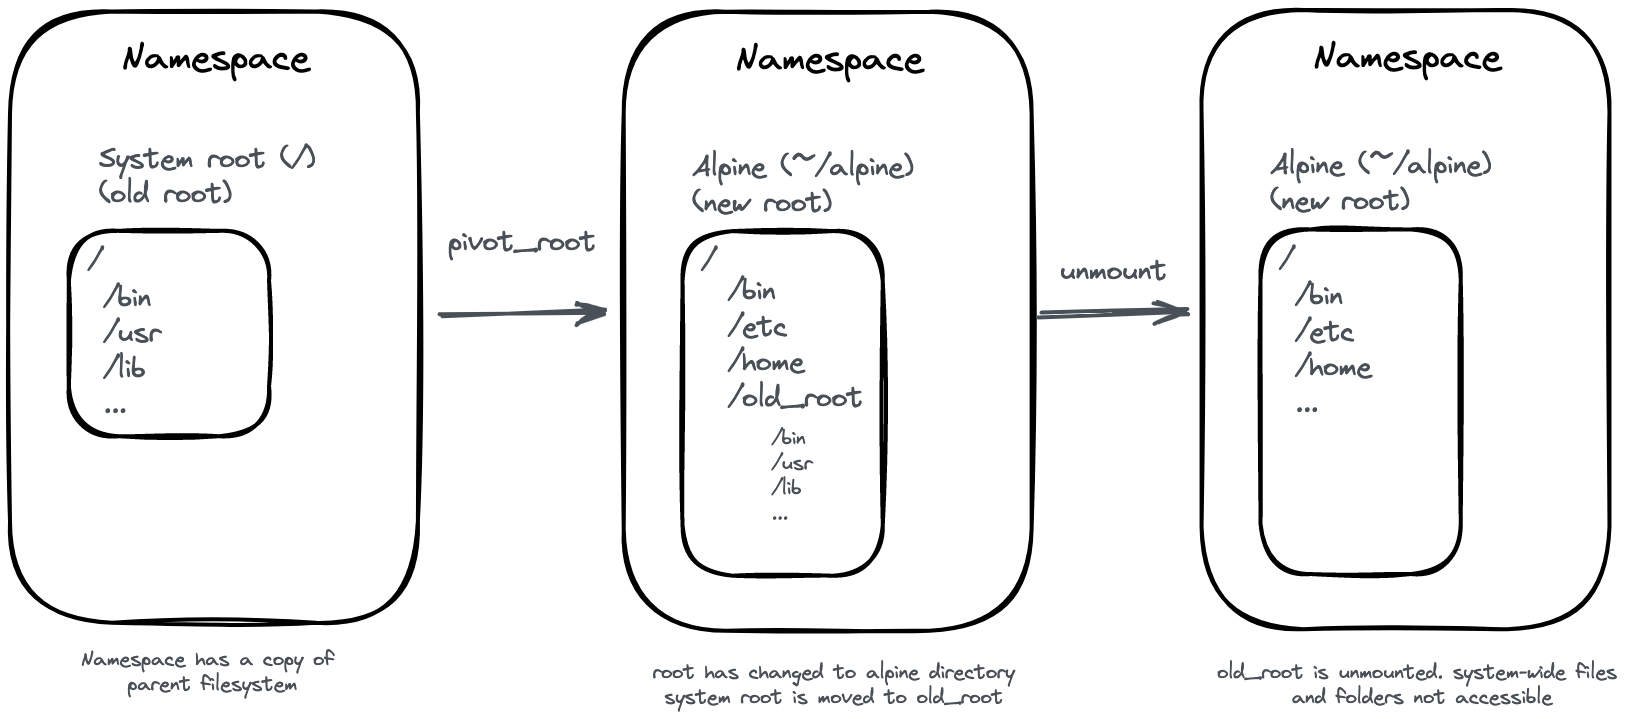
Unmounting the old file system
Now that we have our new root mounted, we can move on to unmount our old root.
root@host:/# umount -l old_root/
root@host:/# rmdir old_root/
Now that our old filesystem is no longer accessible, we have completely isolated our namespace to a new filesystem. Any changes made here should still reflect outside our namespace, but will only happen within the alpine directory. We cannot touch any files which are outside the alpine directory.
Docker follows a similar pattern while mounting images that act as / within the container.
Conclusion
We have successfully replicated the isolated docker filesystem in this post using a minimal Alpine image. Note that this Alpine image contains absolutely minimal libraries and executables and is only for demonstration purposes. To use it for development or production purposes, we would either have to upgrade to the standard archive from the website or install the libraries ourselves.
Our current setup just provides a gist of how docker works internally. Docker uses the aufs layered file system to store and update data, which is very different compared to our current setup. It also isolates the network namespace which lets us host multiple applications using the same port in the system. We shall look into these topics sometime in the future.
As always, if you enjoy these articles, please consider subscribing to this publication or following me on Twitter at @lezwon. if you have any questions or suggestions feel free to reach out to me in the comment section or on Twitter. I would be more than happy to incorporate changes or discuss any questions.
References
- Ovens, S. (2021, March 23). Building a container by hand using namespaces: The mount namespace. Enable Sysadmin. https://www.redhat.com/sysadmin/mount-namespaces
- A deep dive into Linux namespaces, part 3. (2019, July 18). Chord Simple. http://ifeanyi.co/posts/linux-namespaces-part-3/
- pivot_root(2) - Linux manual page. (n.d.). Linux Manual Page. https://man7.org/linux/man-pages/man2/pivot_root.2.html
- index | Alpine Linux. (n.d.). Alpine Project. https://alpinelinux.org/


