
Part 1: Building a container from scratch

The previous post introduced the Linux Namespaces feature and explained how the entire container technology is built upon it. In this post, we will quickly try to replicate some of the container functionalities with Namespaces using just our terminal. This will give us a gist on how Docker images and containers function.
The Unshare command
Linux distros provide a utility command to quickly test out namespaces. The unshare command in Linux, lets us run programs in newly created namespaces. Let's test it out.
Open your terminal and run the following command:
localuser@hostname:~$ unshare --user --map-root-user --pid --mount-proc --mount --fork bashYou will notice the console immediately changes to root@hostname:$. The result of this command is very similar to what happens when you run docker exec -it container /bin/bash.
This command will kick off a new process and execute bash in it. Notice the flags passed to this command. These flags instruct the unshare command to create new namespaces for the child process in their respective domains.
- The
--userflag creates a new namespace for the users and groups within the process which does not affect the host system. - The
--map-root-usermaps the current user on the host system to the root user within the namespace. - The
--pidflags create a new processes namespace, isolating the processes id's within the namespace. - The
--mount-procflag is a bit complicated to understand, but it essentially mounts the/procdirectory which is used to track and monitor processes. - The
--mountflag creates a new mount namespace for the child process. - The
--forkflag forks the current process into the new namespace and then callsexecon the new process.
Now that we have bash running in a new namespace, let's verify a couple of things.
The user is set to root
Running id within the namespace shows that the user in this namespace has root privileges.
root@hostname:~# id
uid=0(root) gid=0(root) groups=0(root),65534(nogroup)
However, the root user in the namespace is mapped to the localuser in the parent namespace. It is root only within the new namespace. The limitations of localuser still apply while trying to access files that are prohibited. For example, trying to access the /root folder will show the following errors.
root@hostname:~# ls /root/
ls: cannot open directory '/root/': Permission denied

root@hostname:~# sudo ls /root/
sudo: error in /etc/sudo.conf, line 0 while loading plugin "sudoers_policy"
sudo: /usr/lib/sudo/sudoers.so must be owned by uid 0
sudo: fatal error, unable to load plugins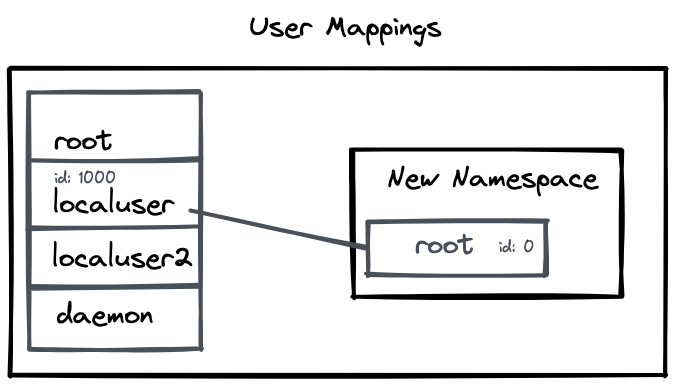
To verify that the root user is mapped to localuser, we can also create a file within our namespace, and check the owner of the file outside the namespace to verify the mapping.
root@hostname:~# touch root.html
root@hostname:~# ls -lh | grep root.html
-rw-r--r--  1 root root    0 Feb 20 12:25 root.html
root@hostname:~# exit

localuser@hostname:~# ls -lh | grep root.html
-rw-rw-r-- 1 localuser localuser    0 Feb 20 12:29 root.html
Also, note that the new user namespace does not have any User mappings from its parent namespace. So if we try to switch to another user within the namespace, we will see an error as such.
root@democpu:~# su daemon
setgid: Invalid argument
The user namespace here is totally isolated from its parent and is unable to access any of its permissions.
Process ID starts from 1
You can run ps command to view the current processes in the Namespace. As seen in the output below, you can see only two processes. and the bash process has an id 1 within the namespace.
root@hostname:~# ps
  PID TTY          TIME CMD
    1 pts/0    00:00:00 bash
   12 pts/0    00:00:00 ps
These processes have another PID mapped to them in the global namespace.
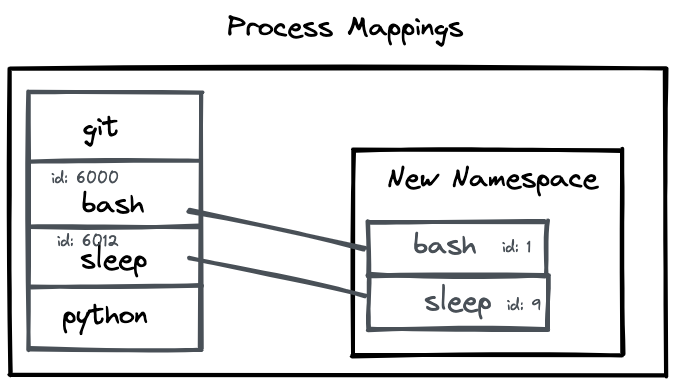
We can verify the same by running the sleep command within the namespace and check its PID outside the namespace.
root@hostname:~# nohup sleep 100 &
root@hostname:~# ps -ft 0
UID        PID  PPID  C STIME TTY          TIME CMD
root         1     0  0 15:16 pts/0    00:00:00 bash
root         9     1  0 15:16 pts/0    00:00:00 sleep 100
root 11 1 0 15:17 pts/0 00:00:00 ps -ft 0localuser@hostname:~$ ps -ft 0 | grep sleep
UID PID PPID C STIME TTY TIME CMD
localuser 6012 6001 0 15:16 pts/0 00:00:00 sleep 100As we can see in the output above, the sleep command has the UID of root within the namespace and a PID of 9. When we try to find the same process outside the namespace in our terminal, we can see it is mapped to the UID of localuser and has a PID of 6012.
The filesystem is isolated
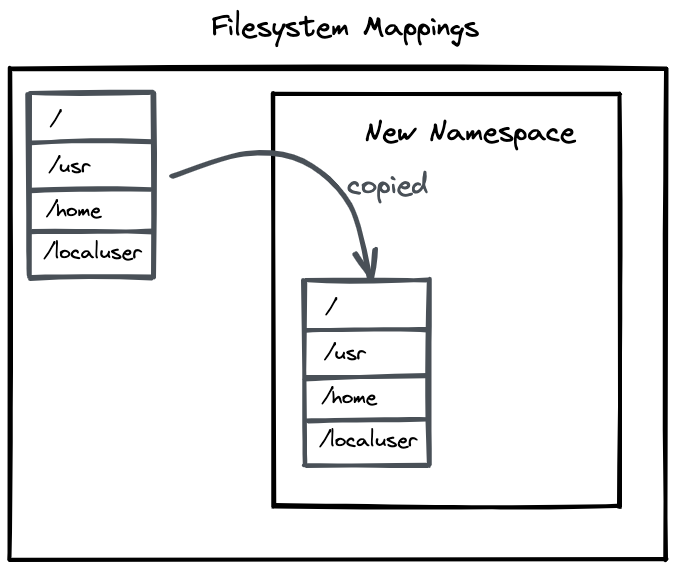
The last thing we would like to check is that our mount points are isolated and we do not touch any files from our parent namespace. Yet as we have seen in our previous examples, we were able to access the current folder and create a file in there too. This is because the new mount namespace by default inherits the mount points from its parent. This is why the root / file system and all other mounts are by default visible in our namespace.
However, these mount points are a copy of the parent mount points. Any changes to the mounted disks here will not reflect in the parent namespace.
We can try this by mounting a folder using bind.
root@hostname:~# mkdir tempdir
root@hostname:~# mount --bind ./existing ./tempdir/
root@hostname:~# ls tempdir/
file1.txt  file2.txt file3.txt
In the snippet above, we created a temporary directory called tempdir and mounted an existing path to it. Now when we ls into tempdir we should find the contents of existing directory in it.
Let's check the mounted directory binding using findmnt.
root@hostname:~# findmnt | grep tempdir
└─/home/localuser/tempdir		/dev/sdb1[/home/localuser/server] 										ext4        rw,relatime,discard
As we can see in the console above, the mount entry is present. Now let's check for this entry outside the namespace.
localuser@hostname:~# findmnt | grep tempdir
localuser@hostname:~#
localuser@hostname:~$ ls tempdir/
localuser@hostname:~$
As you can see, there is no entry outside the namespace. Even the tempdir directory is empty. This example shows how mount namespaces are isolated from the systems.
Conclusion
So far we have seen that any new mounts are not reflected in the parent filesystem. However, we still have access to the root file system /. Creating, modifying, deleting files here will still affect the files outside the namespace. What we need is an isolated filesystem, wherein the changes made to files within the namespace won't affect our host system.
This, coupled with an isolated process and user namespace, can give us a virtual machine-like environment for our programs to run within. We will look into building such an isolated filesystem in our next post.
If you would like to follow this series of articles, please consider subscribing to this publication. You can also follow me on Twitter at @lezwon.
References
- How Docker Works - Intro to Namespaces. (2020, February 21). [Video]. YouTube. https://www.youtube.com/watch?v=-YnMr1lj4Z8
- Mauro, T. (2021, September 10). What Are Namespaces and cgroups, and How Do They Work? NGINX. https://www.nginx.com/blog/what-are-namespaces-cgroups-how-do-they-work/
- Unsharing the user namespace for rootless containers. (2020, December 24). [Video]. YouTube. https://www.youtube.com/watch?v=YmbCfeVPHEI


