Build your own Event Loop in Python

Event Loop is a commonly heard term in the Javascript Ecosystem. It is the foundation upon which the entire Javascript V8 engine functions. The Event loop, however, is not exclusive to Javascript. It is a common programming paradigm found in almost every language today. This post examines the purpose of an Event Loop and how it is implemented within Python. It is an attempt to summarize "Build Your Own Async" by David Beazley.
What is an Event Loop and why do we need it?
An Event Loop also referred to as an Event Dispatcher or a Task Scheduler is a software design constructed to handle system events concurrently. The main purpose of an Event Loop is to unclog blocking operations and let multiple operations execute in "parallel". Python 3.5 comes with native in-built support for asynchronous operations with the asyncio library. However, knowing the fundamentals of how it works should allow you to implement asynchronous operation support in any library.
Building blocks of the Event Loop
There are a couple of software constructs and operations that make up an asynchronous framework. The primary purpose of this design ensures that no Non-CPU intensive task blocks a CPU-intensive task.
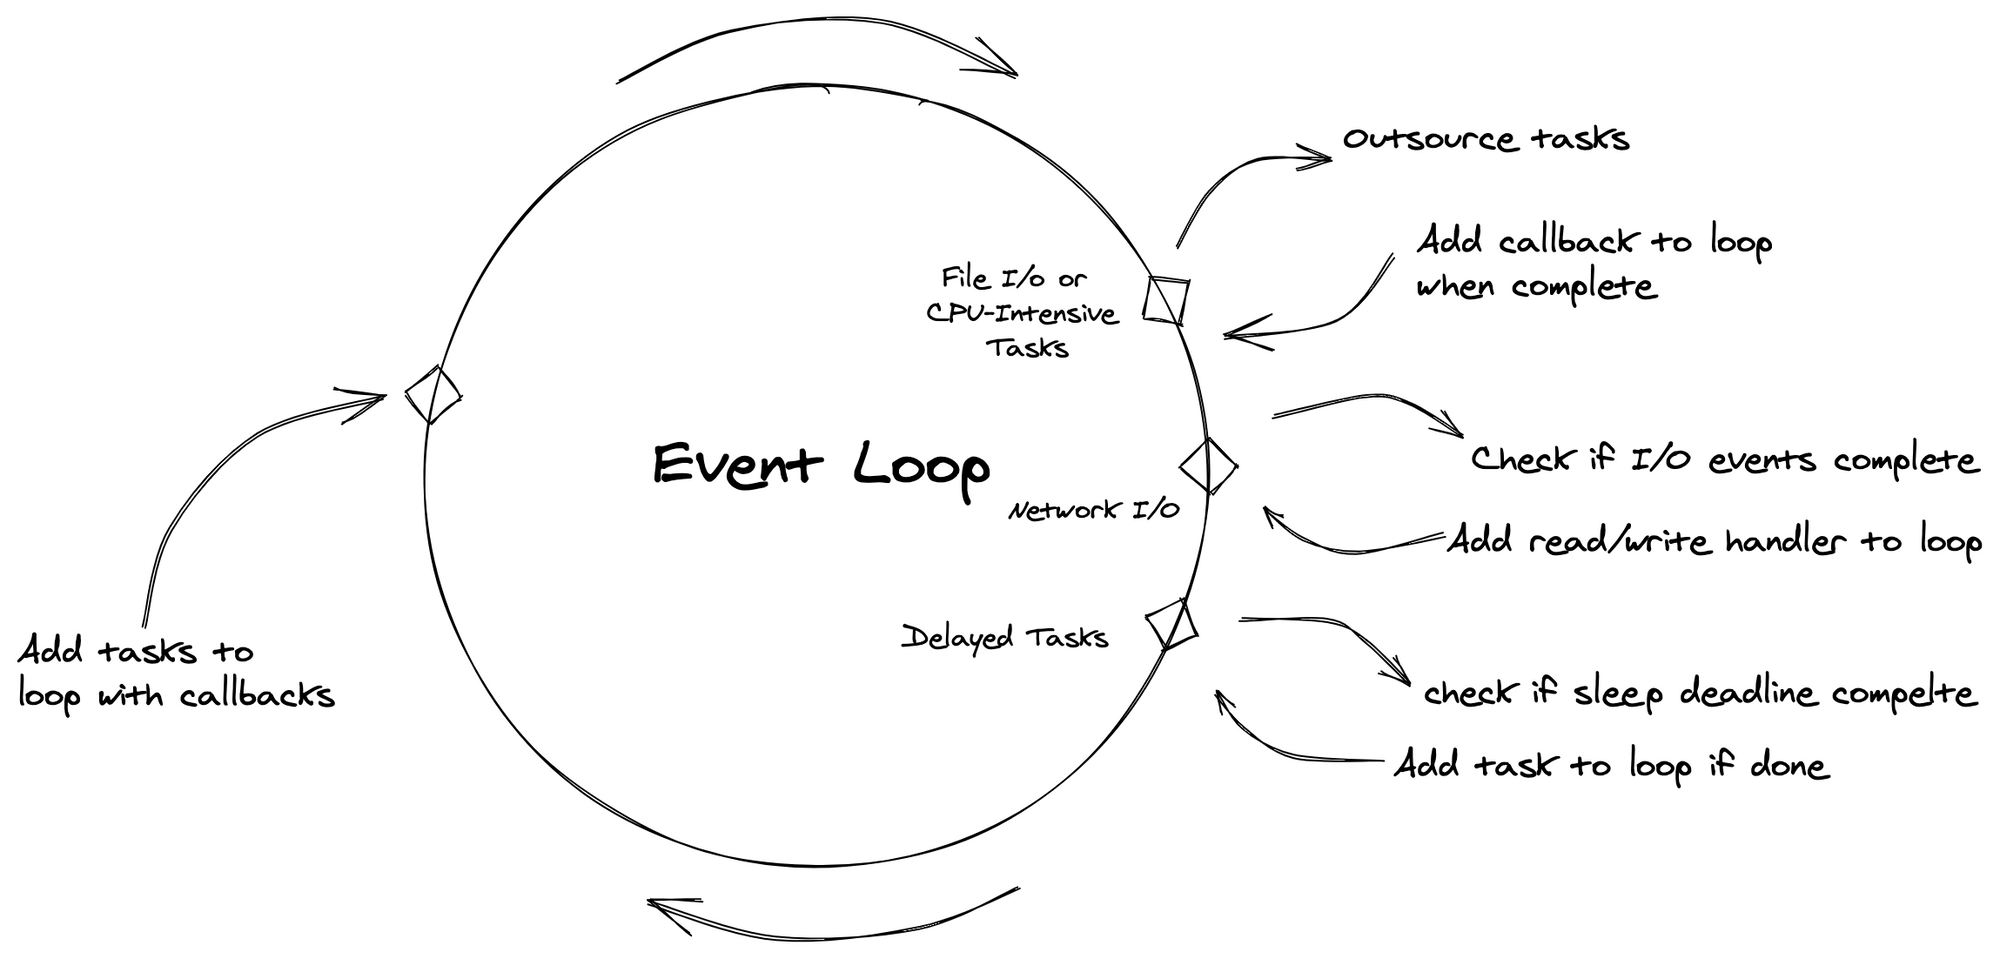
A While loop
At its core, the Event Loop is a while loop that iterates through the tasks and executes them.
while tasks:
    for task in tasks:
        execute(task)
Task Queue
The task queue contains the tasks that need to be executed. The Event Loop constantly iterates through these tasks and executes them. Tasks can be repeatedly added to the queue when they need to be executed.

from collections import deque

tasks = deque()

def task_1(): print("Task 1")

def task_2(): print("Task 2")

tasks.append(task_1)
tasks.append(task_2)

while tasks:
    task = tasks.popleft()
    task()
Function calls
To execute tasks concurrently we need to add them to the tasks queue in an alternating fashion. Take the following snippet for example. We cannot isolate each iteration of the for loop and execute it independently. The for loop is a sequential construct.
# Cant execute concurrently
def countup(n):
    for i in range(n):
        print("Printing {i}")

def countdown(n):
    for i in range(n):
        print("Printing {n - i}")

tasks.add(lambda: countup(5))
tasks.add(lambda: countdown(5))
However, if we alter the code to use recursive calls, we can add them to the task queue, and achieve a level of concurrency.
# Can execute concurrently
def countup(n):
    print("Printing {i}")
    tasks.add(lambda: countup(n - 1))

def countdown(n):
    def _run(i):
        print("Printing {i}")
        tasks.add(lambda: _run(n - 1))
    _run(n-1)

tasks.add(lambda: countup(5))
tasks.add(lambda: countdown(5))
A non-blocking sleep call
The time.sleep call in Python is a blocking call. Calling the time.sleep within a program pauses the execution of the entire program within Python and blocks other tasks from executing. This outcome might not be desired in many situations as we might wish to delay only certain functions and not the entire program. Asyncio mitigates this problem by suspending the current function and switching to the next one in the task queue.
import time
from collections import deque

sleeping = []
ready = deque()

# Add func to sleeping queue with deadline
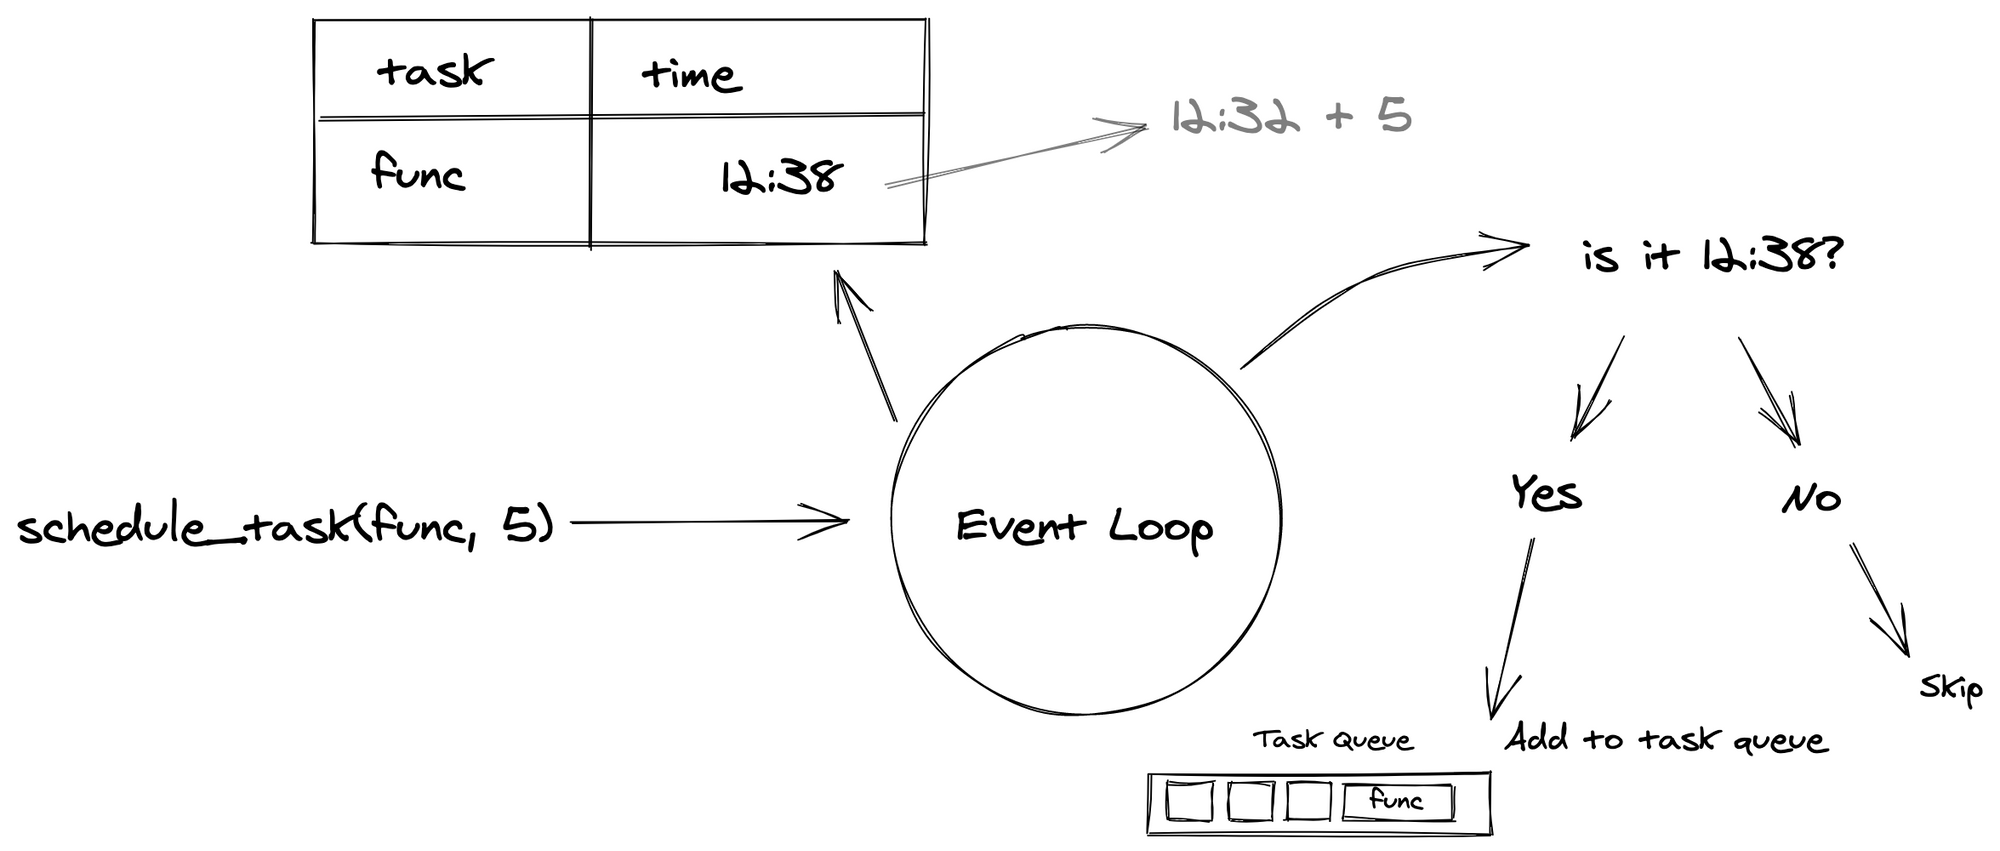
def schedule_task(task, delay):
    deadline = time.time() + delay
    sleeping.append((deadline, task))

schedule_task(lambda: print("Printing after delay"), 5) # 5 second delay
The schedule_task function above calculates the deadline for the task to be executed and adds it along with the function to the sleeping queue. On every iteration, the Event Loop checks if the deadline has expired. If it has, the task is moved to the ready queue.
while ready or sleeping:
    if not ready:
       deadline, task = sleeping.pop()
       delta = deadline - time.time()
       if delta < 0 # check if deadline is over
	       ready.append(task)

    # execute task
    while ready:
        task = ready.popleft()
        task()
Non-Blocking sockets for Network I/O
The traditional send and recv socket calls are blocking in nature. If there is no message to be received, the recv system calls will block the program until it receives a message. To get around this issue we can use the select call. The select call will provide us with the status of the sockets i.e if there is a message waiting to be read, or if a message has been sent. Using the select call, we can call recv only when there is a message to be read, and send messages only when the write buffer is free. To learn more about the select call in python, you can refer to this video.
readable, writeable, _ = select([socket], [socket], [], timeout=.2)
for read_sock in readable:
	read_sock.recv(1000) # Read from socket

for write_sock in writeable:
	write_sock.send("hello") # Write to socket
Let's build a non-blocking socket-based server that echoes the input back to the client. Initialize your socket as follows.
import socket
from select import select
from collections import deque


readable_t = {}
writable_t = {}
tasks = deque()

addr = ('127.0.0.1', 3000)
sock = socket.socket(socket.AF_INET,socket.SOCK_STREAM)
sock.bind(addr)
sock.listen(1)
sock.setblocking(False)
The readable_t and writable_t dictionaries above hold the callbacks for the read and write events for a socket.
Let's also have 3 non-blocking function calls that add the task to the task queue. These functions are primarily meant to accept, send and receive messages.
def accept(sock):
	'''
    Callback to accept connections from a client
	'''
    client, addr = sock.accept()
    readable_t[client] = lambda: recv(client) # adds recv to read map

def recv(client):
	'''
    Callback to receive message from a client
	'''
    data = client.recv(10000)
    writable_t[client] = lambda: send(client, data) # adds send to write map

def send(sock, data):
	'''
    Callback to send message to the client.
    '''
    sock.send(b'Got: ' + data)
    readable_t[sock] = lambda: recv(sock) # adds recv to read map once the message is sent
Note that these functions do not actually send or receive messages. They just facilitate it by adding the tasks to the task queue.
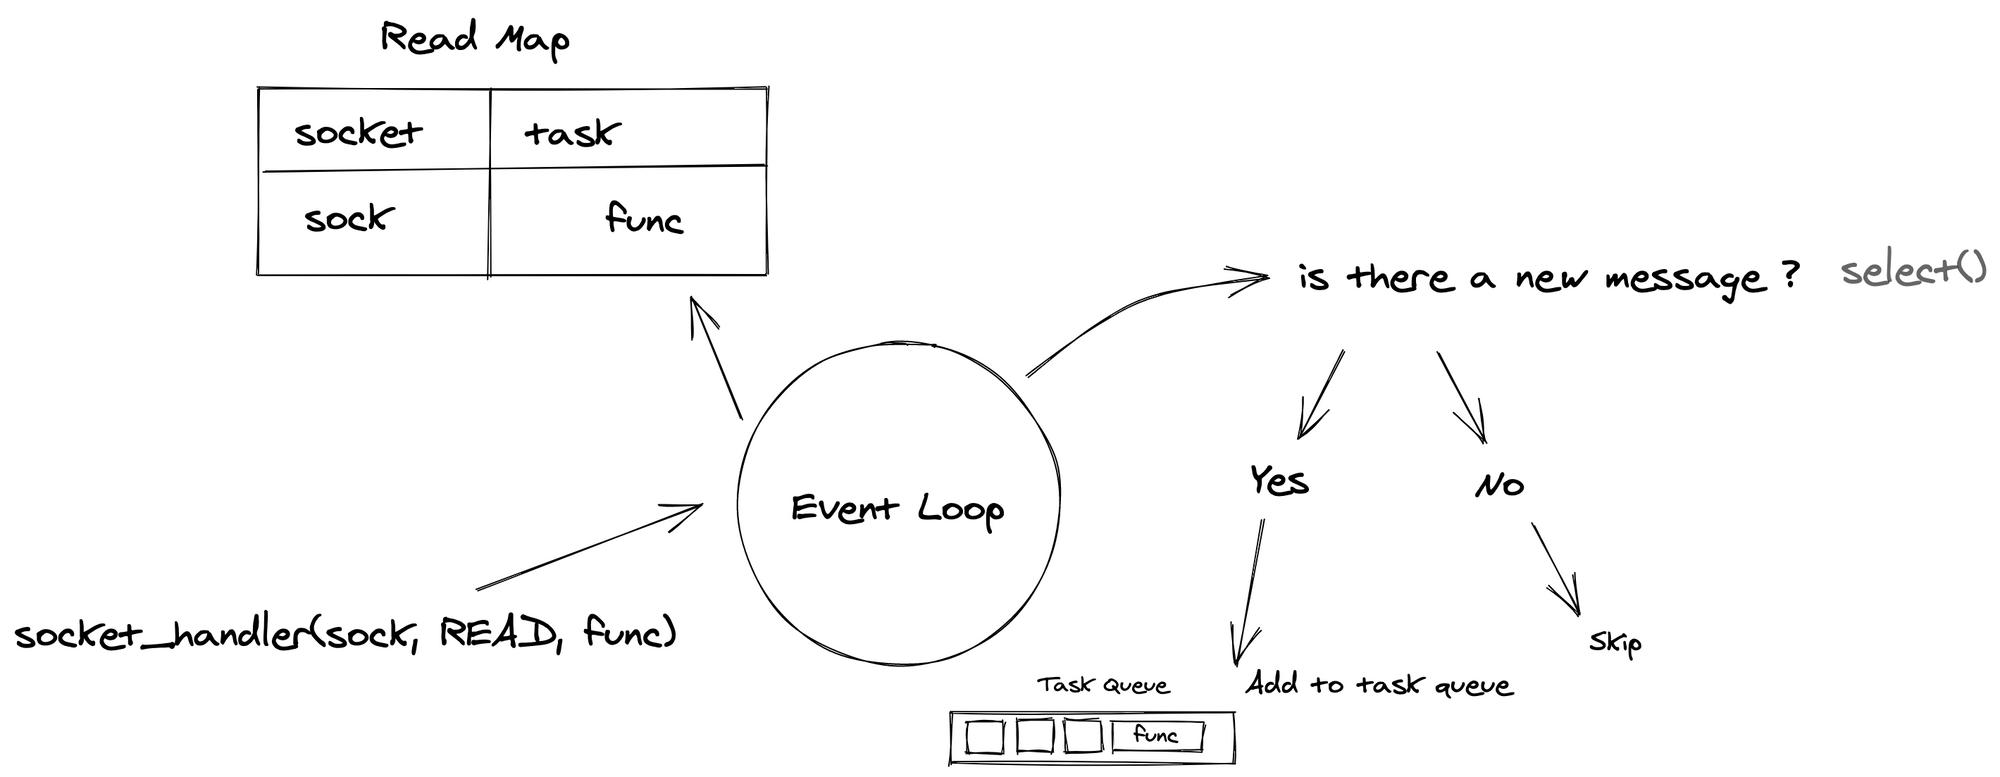
The following snippet watches for any messages and if found, calls the accept function. The while loop iteratively checks for any messages that have arrived or departed and adds the respective read/write calls to the task queue.
readable_t[sock] = lambda: accept(sock)

while True:
	# check is anything has to be read or written
    readable, writeable, _ = select(readable_t.keys(), writable_t.keys(), [], .2)
    for fd in readable:
        tasks.append(readable_t.pop(fd)) # adds read task to queue
    for fd in writeable:
        tasks.append(writable_t.pop(fd)) # adds write task to queue

    while tasks:
        task = tasks.pop()
        task()
Putting it all together
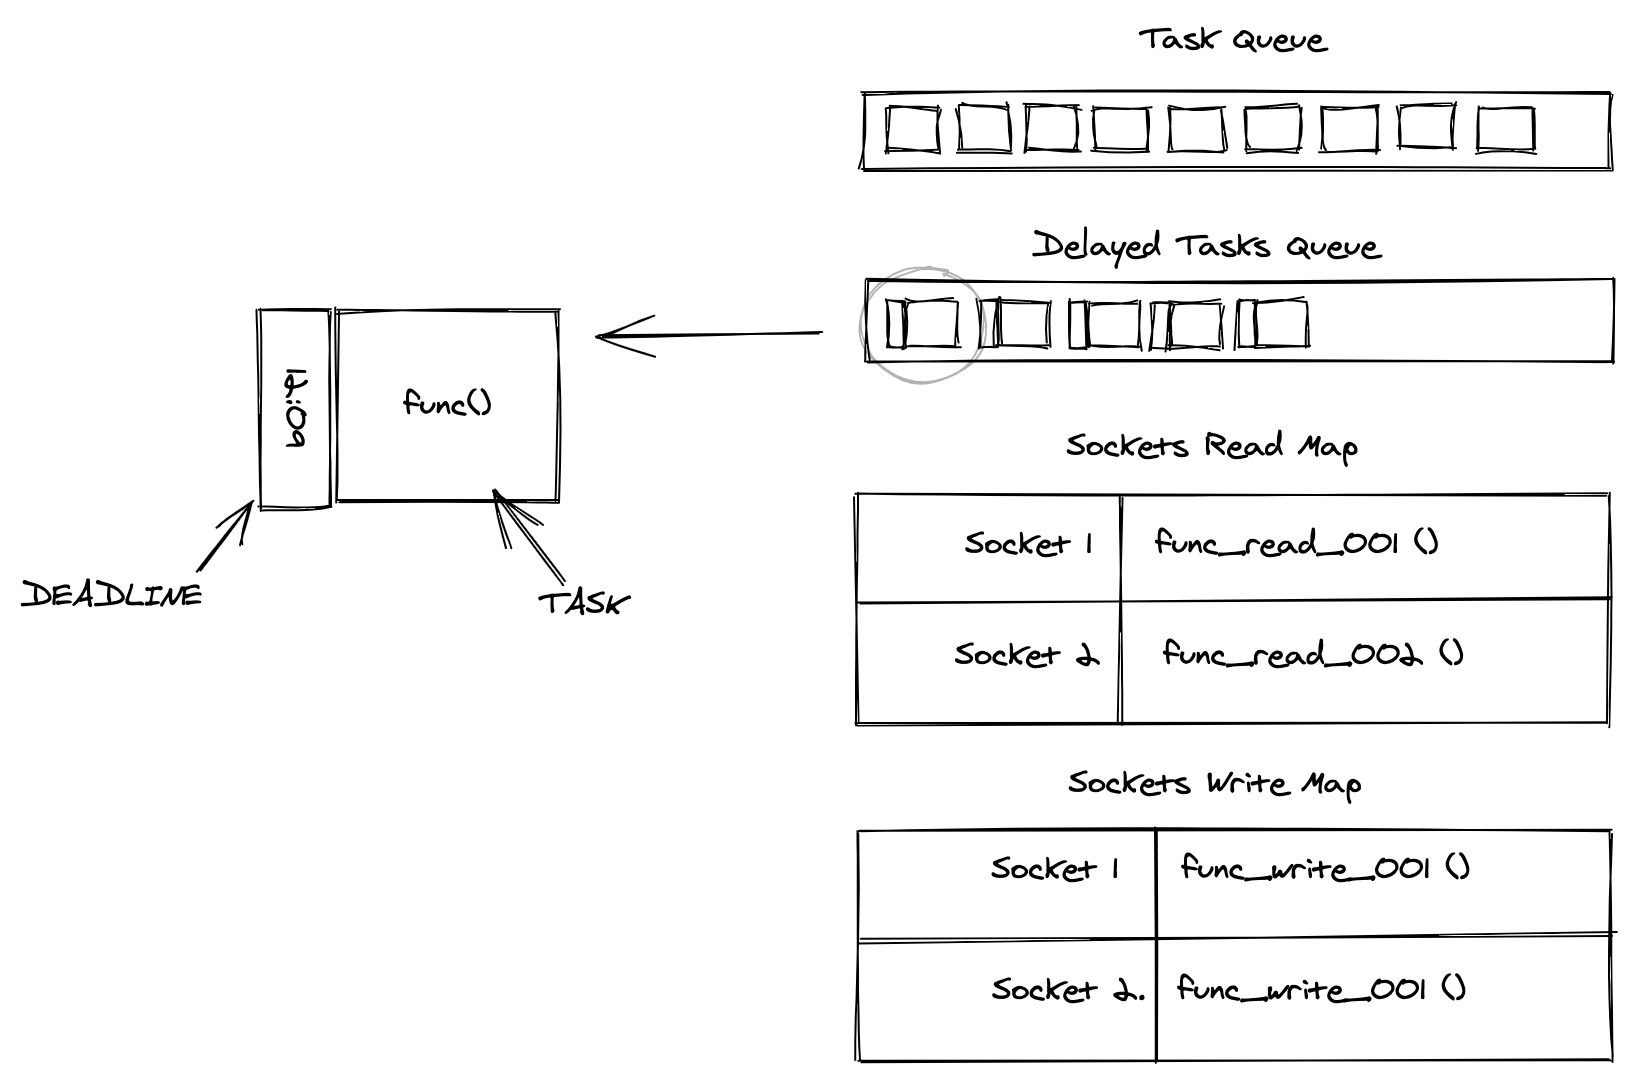
We can put all this together within a Scheduler class. This class will be responsible for adding tasks to the queues, checking for new messages on the sockets, managing the deadlines on the sleeping tasks, and executing the ready tasks.
import socket
from select import select
from collections import deque
import time
import heapq


class Scheduler:
    def __init__(self):
        self.ready = deque() # Holds the tasks to be executed
        self.sleeping = [] # Holds the sleeping tasks
        self.read_waiting = {} # Callbacks to read from socket
        self.write_waiting = {} # Callback to write to socket

    def call_soon(self, func):
        ''' Adds the func to the ready queue immediately '''
        self.ready.append(func)

    def call_later(self, sleep, func):
        '''
        Adds the func to the sleeping queue
        after calcualting deadline
        '''
        deadline = time.time() + sleep
        heapq.heappush(self.sleeping, (deadline, func))

    def read_wait(self, fileno, func):
        ''' Adds callback for reading a socket '''
        self.read_waiting[fileno] = func

    def write_wait(self, fileno, func):
        ''' Adds callback for writing to a socket '''
        self.write_waiting[fileno] = func

    def run(self):
        ''' Run the Event loop '''
        while self.ready or self.sleeping or self.read_waiting or self.write_waiting:
            if not self.ready:
                if self.sleeping:
                    deadline, _ = self.sleeping[0]
                    timeout = deadline - time.time() # Calculate timeout
                    if timeout < 0:
                        timeout = 0
                else:
                    timeout = None

                # Use timeout in select call to check Network I/O
                ready_read, ready_wait, _ = select(self.read_waiting, self.write_waiting, [], timeout)

                for fd in ready_read:
                    self.ready.append(self.read_waiting.pop(fd))

                for fd in ready_wait:
                    self.ready.append(self.write_waiting.pop(fd))

                # Check Sleeping tasks
                now = time.time()
                while self.sleeping:
                    if self.sleeping[0][0] < now:
                        deadline, func = heapq.heappop(self.sleeping) # Pop expired sleeping func
                        self.ready.append(func) # add it to ready queue
                    else:
                        break

            # Execute the ready tasks
            while self.ready:
                func = self.ready.popleft()
                func()
The class above implements the same functionality we discussed earlier with a few enhancements. Let's break down the run method a bit.
The run method is responsible for starting the Event Loop and running the tasks within. It contains the core functionality of the Event Loop. Within the run method, we first check if there are any tasks to be executed or any event handlers waiting. If there isn't anything, the loop exits and the method returns.
if self.sleeping:
    deadline, _ = self.sleeping[0]
    timeout = deadline - time.time() # Calculate timeout
    if timeout < 0:
    	timeout = 0
else:
	timeout = None
The first thing we do within the loop is calculate the pending time left until we execute the first sleeping task. If the deadline has already passed, we set the timeout as 0. If there aren't any sleeping tasks we set the timeout as None (indefinite). We use this timeout within the select call, which fetches Network I/O updates.
# Use timeout in select call to check Network I/O
ready_read, ready_wait, _ = select(self.read_waiting, self.write_waiting, [], timeout)

for fd in ready_read:
	self.ready.append(self.read_waiting.pop(fd))

for fd in ready_wait:
	self.ready.append(self.write_waiting.pop(fd))
The select call here returns the file descriptors/sockets, which are ready for reads/writes. We then append their respective handlers to the ready queue.
Our next task is to find all the sleeping tasks whose deadline has expired during the time we made the select call, and add them to the ready queue.
# Check Sleeping tasks
now = time.time()
while self.sleeping:
	if self.sleeping[0][0] < now:
		deadline, func = heapq.heappop(self.sleeping) # Pop expired sleeping func
		self.ready.append(func) # add it to ready queue
	else:
		break
Note that we use the heapq module to help us maintain the sleeping tasks ordered by their deadline (earliest are the first) when pushing and popping.
Our final job in the run method is to execute the tasks within the ready queue at the end.
# Execute the ready tasks
while self.ready:
	func = self.ready.popleft()
	func()
Now let us define our TCP server using sockets along with the countup and countdown functions. If you arent familiar with sockets, I suggest you go through this video before you implement the following code.
addr = ('127.0.0.1', 3000)
sock = socket.socket(socket.AF_INET,socket.SOCK_STREAM)
sock.bind(addr)
sock.listen(1)
sock.setblocking(False)
maxbytes = 10000

def accept(sock):
    ''' Accepts a connection '''
    client, addr = sock.accept()
    print("Connected to ", addr)
    sched.read_wait(client, lambda: recv(client))

def recv(client):
    ''' Recives message from client '''
    try:
        data = client.recv(maxbytes)
        if not data:
            raise ConnectionError
    except (ConnectionError, ConnectionResetError) as e:
        client.close()
        print("Connection Closed")
        sched.read_wait(sock, lambda: accept(sock))
        return
    except Exception as e:
        print(e)

    print("Received message: ", data.decode())
    sched.write_wait(client, lambda: send(client, data))

def send(sock, data):
    ''' Send message to client socket '''
    sock.send(b'Got: ' + data)
    sched.read_wait(sock, lambda: recv(sock))

def countdown(n):
    if n > 0:
        print('Down', n)
        sched.call_later(4, lambda: countdown(n-1))

def countup(n, i=0):
    print('Up', i)
    sched.call_later(1, lambda: countup(n, i+1))
Now we can run our TCP server along with the count up and countdown functions. The Scheduler will pick up the tasks from the ready queue and execute them at every iteration.
sched = Scheduler()
sched.read_wait(sock, lambda: accept(sock))
sched.call_soon(lambda: countdown(6))
sched.call_soon(lambda: countup(6))

sched.run()
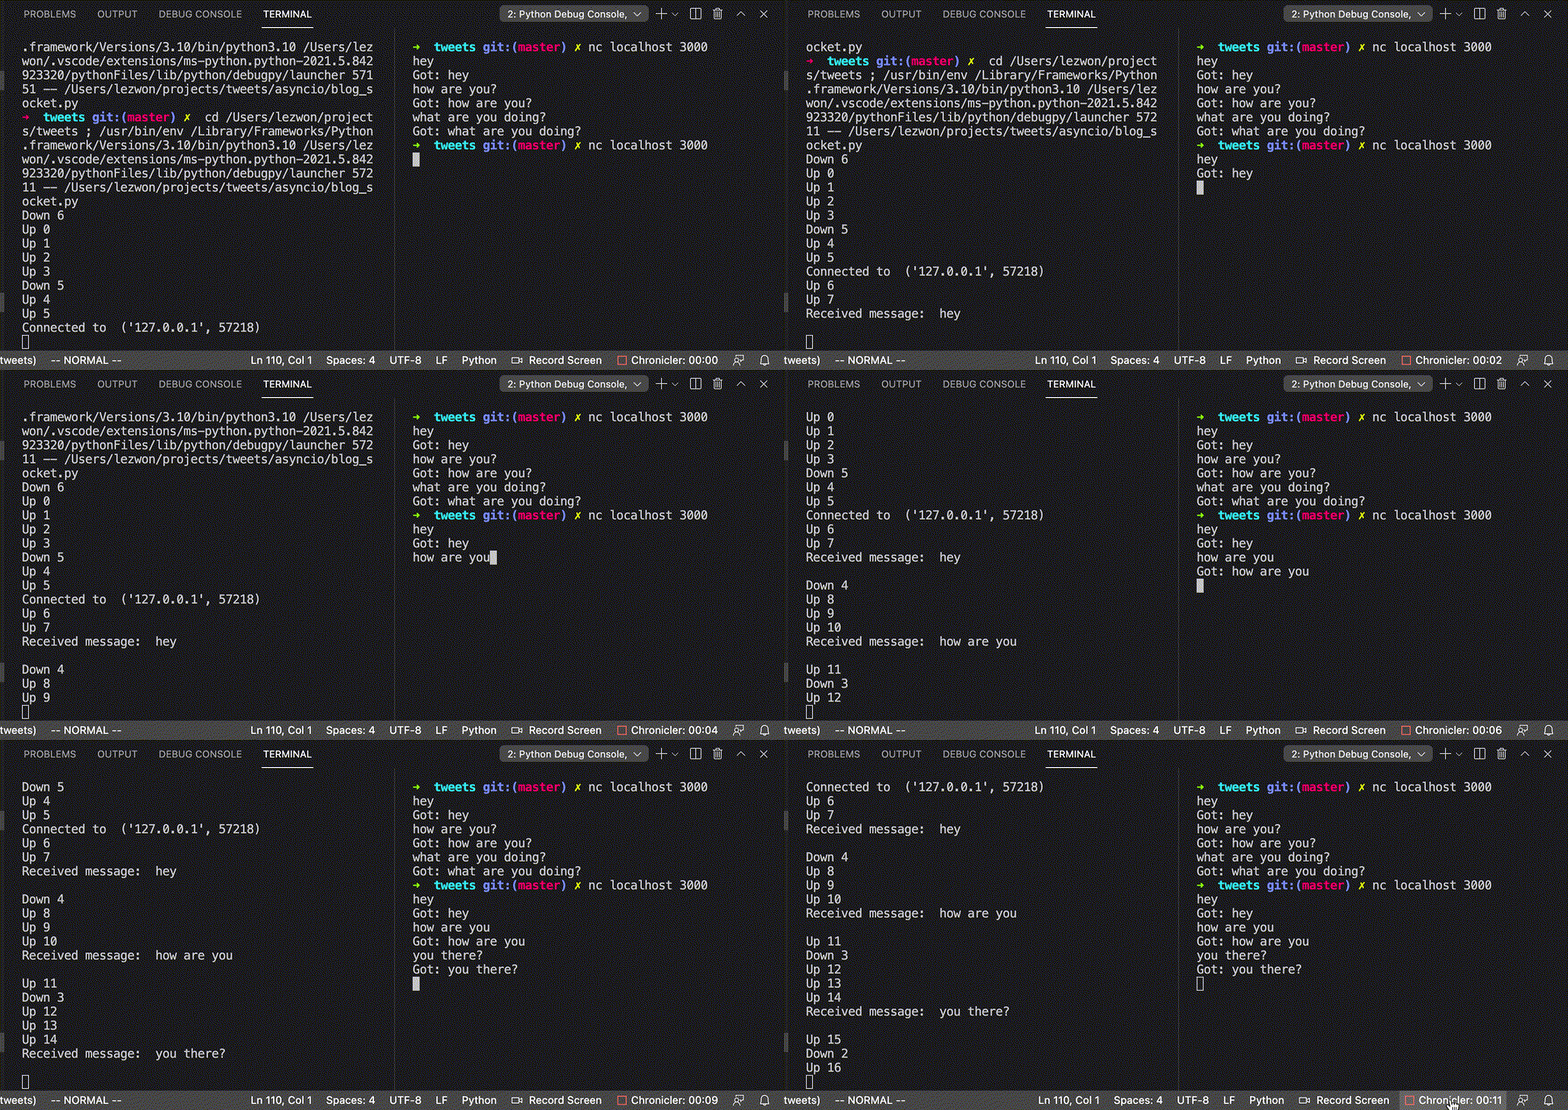
You can notice the results in the frame below. The console prints the count up and countdown concurrently while also checking for new messages received via the socket.
Conclusion
This post just described the mere founding blocks of the asyncio framework. The framework still has a vast amount of features and tweaks that are uncovered. If you need a guide to build the framework from scratch, I recommend you to watch the workshop (which this post tries to summarize) by David Beazley here. David covers the concepts of asynchronous operations in-depth to help you understand how it all works under the hood. Also if you feel adventurous and would like to delve into the asyncio code of CPython, then the base_events.py file might be a good place to start.
If you like this post and would like to subscribe to such topics in the future, please consider following me on Twitter. I frequently delve into the internals of software and journal my learnings on this blog, so make sure you subscribe to it.
The code for this post is also available as a gist on Github.
References
- Dabeazllc. (2019, October 17). Retrieved May 25, 2021, from https://www.youtube.com/watch?v=Y4Gt3Xjd7G8
- Vaidik Kapoor. (2018, July 05). Understanding Non Blocking I/O with Python - Part 1. Retrieved from https://medium.com/vaidikkapoor/understanding-non-blocking-i-o-with-python-part-1-ec31a2e2db9b
- Ivan Velichko, I. (2021, January 03). Explaining event loop in 100 lines of code. Retrieved from https://iximiuz.com/en/posts/explain-event-loop-in-100-lines-of-code/
- Import asyncio: Learn Python's AsyncIO #2 - The Event Loop. (2020, April 20). Retrieved from https://www.youtube.com/watch?v=E7Yn5biBZ58
- Python Socket Programming Tutorial. (2020, April 05). Retrieved from https://youtu.be/3QiPPX-KeSc

